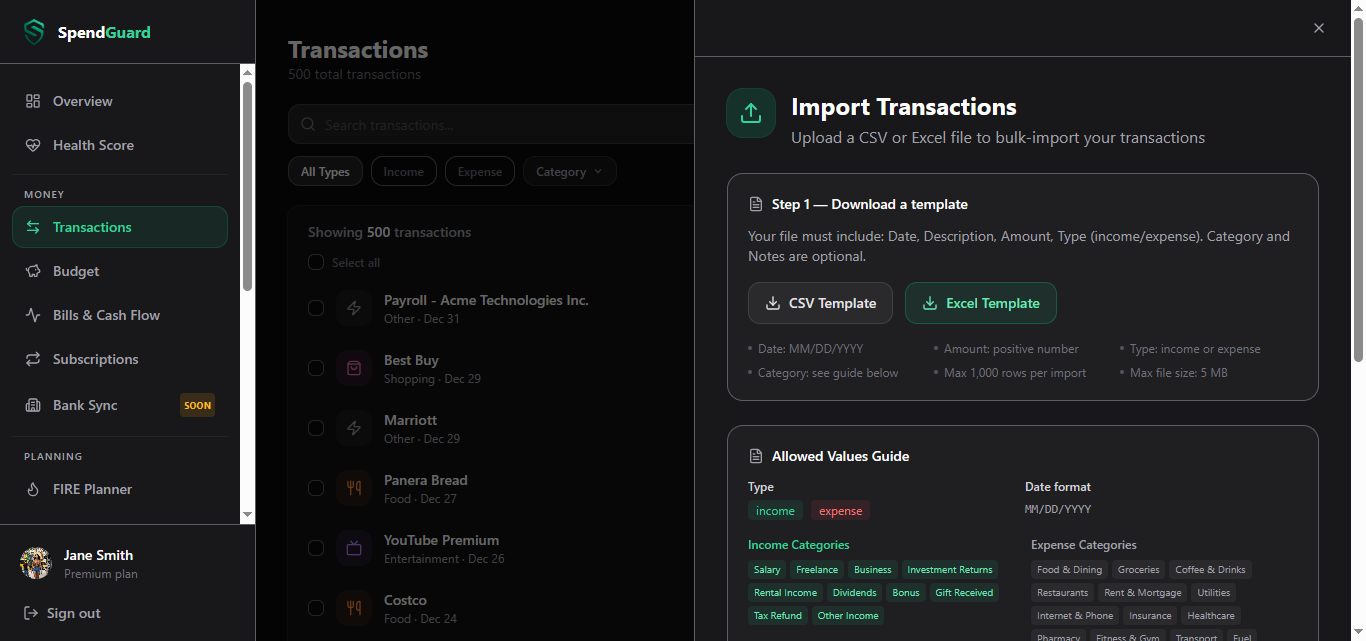
Every bank lets you export your transaction history as a file — usually a CSV, sometimes an Excel spreadsheet. That export is the fastest way to get months of spending into a budgeting app without linking your bank account or handing over credentials to an aggregator. This guide walks through exactly how to do it: where to get the file, how to format it so an app reads it correctly, and the mistakes that cause a "0 rows imported" error.
Last updated: July 24, 2026.
Step 1: Export the CSV from Your Bank
Log into your bank's website (not the app — desktop export options are usually more complete) and look for "Statements," "Export," or "Download transactions." Most banks let you pick a date range and a format; choose CSV if it's offered, Excel (.xlsx) if not. This is your own data, downloaded from your own login — no third party ever sees your bank credentials.
Step 2: Check What Columns Your Budgeting App Expects
A budgeting app needs to know, at minimum, four things about each transaction: date, description, amount, and type. Get these four right and the import almost always works on the first try.
| Field | Required? | Format |
|---|---|---|
| Date | Yes | A recognizable date format (MM/DD/YYYY is safest) |
| Description | Yes | Merchant or payee name |
| Amount | Yes | A positive number — the Type field carries the sign |
| Type | Yes | income or expense |
| Category | No | Defaults to "Other" if left blank or unrecognized |
| Notes | No | Free text |
Bank exports rarely match this exactly — column names vary (Trans Date vs Date, Debit Amount vs Amount), and some banks put debits and credits in separate columns instead of a single signed amount. A good importer auto-detects common header variations (SpendGuard's matches aliases like "txn date," "merchant," "posting date," and "credit/debit" automatically); if it can't find a match, it should ask you to map columns manually rather than silently dropping data.
Step 3: Use a Template if Your Bank's Export Is Messy
If your bank's raw export doesn't map cleanly, the more reliable path is to download the app's own import template (SpendGuard offers both a CSV and an Excel version from the Import screen, shown above) and copy your transactions into it. The template locks in the exact column order and gives you the accepted values for Type and Category up front, which avoids the mapping step entirely.
Step 4: Upload and Review Before Confirming
Once the file is uploaded, don't just click import — review the preview screen first. A well-built importer shows you three numbers before anything touches your data: total rows found, valid rows, and rows with errors, with the specific reason for each (like "invalid date" or "missing description").
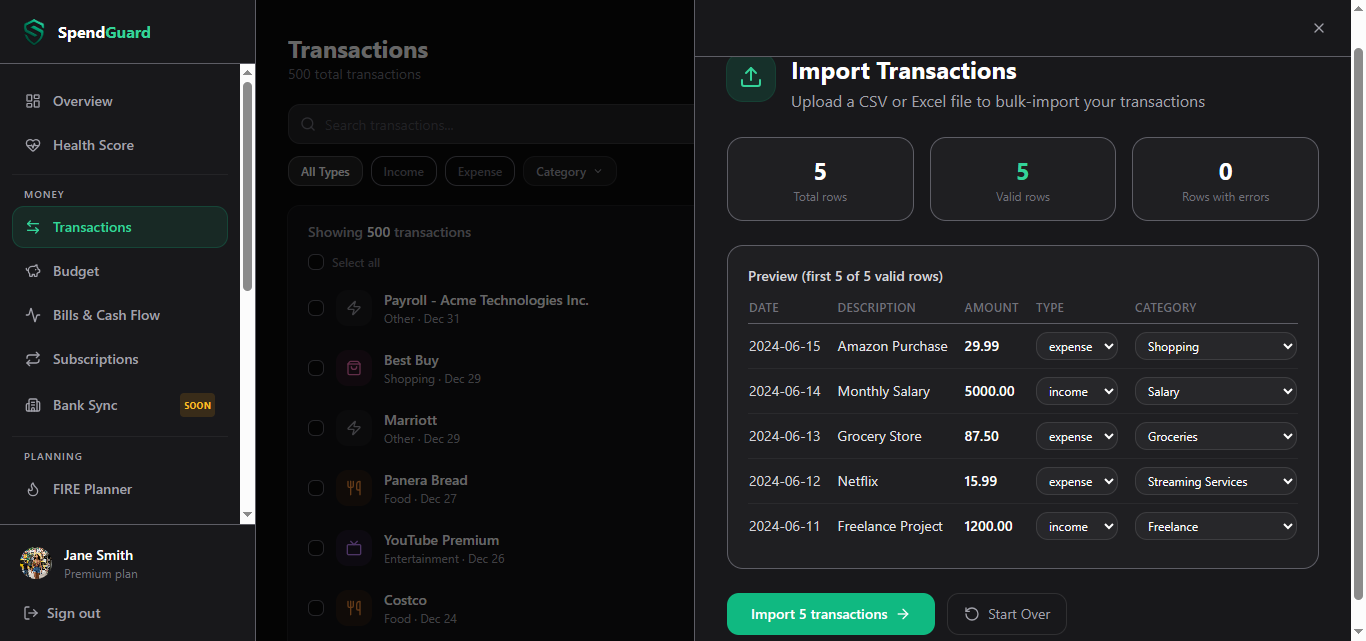
Common limits to expect: most apps cap a single import around 1,000 rows and 5 MB, and duplicate transactions (same date, description, and amount) get skipped automatically so re-uploading a file you already imported doesn't double your numbers.
The Mistakes That Cause a Failed or Empty Import
- Wrong date format.
15/06/2024(day-first) gets misread if the app expectsMM/DD/YYYY. Check the template's date column before uploading a full year of history. - A "help text" row breaks the whole file. Templates that include instructions below the data (e.g., "Allowed values: Groceries | Dining | ...") can confuse a parser's delimiter detection if it scans the full file instead of just the header row — a pipe-heavy instructions line can get mistaken for a pipe-delimited file, collapsing every column into one. This is exactly the kind of edge case worth testing before you trust an importer with a full year of transactions.
- Negative and positive amounts mixed with a Type column. If your bank's export already signs amounts (-45.00 for a purchase), strip the sign and let the Type column (income/expense) carry that meaning — apps that expect positive amounts everywhere will otherwise flag every expense as an error.
- More than one file format assumption. A parser tuned only for comma-separated files can misread a semicolon- or tab-delimited export from certain regional banks. Check the file in a text editor first if the upload fails with no rows detected.
Worked Example
Say your bank's export has these columns: Trans Date, Merchant, Debit, Credit, Memo. Before uploading:
- Rename or map
Trans Date→ Date,Merchant→ Description. - Combine
Debit/Creditinto a single positiveAmountcolumn, and add aTypecolumn marking each row income or expense based on which original column had a value. - Leave
Categoryblank if you don't already track it — a good importer defaults uncategorized rows to "Other" rather than rejecting them, and you can bulk-recategorize after import.
That's the whole job. For someone with a year of transactions (roughly 600–900 rows for an average spender), this takes about 10–15 minutes once, versus rebuilding a spreadsheet from scratch.
FAQ
Does importing a CSV require linking my bank account? No — that's the point of the CSV/file-import path. You download the file from your own bank login and upload it directly; no aggregator (like Plaid) or third-party credential sharing is involved at any point.
What if my bank only offers a PDF statement, not a CSV? Most banks still offer CSV or Excel export somewhere in online banking, even if the mobile app defaults to PDF statements — check the desktop site's "Documents" or "Export" section. A few finance apps can convert PDF statements, but manual retyping for a single month is often faster than debugging PDF parsing.
Will it re-import transactions I already added? A properly built importer treats an exact match on date, description, and amount as a duplicate and skips it — so re-uploading the same file, or an overlapping date range, won't double-count your history.
Can I import an Excel file instead of CSV?
Yes, most modern importers accept both .csv and .xlsx/.xls — useful if your bank only exports Excel, or if you've been keeping your own spreadsheet and want to migrate it in one step.
SpendGuard imports both CSV and Excel files on the Pro plan — download the template, drop in your bank export, and Finn (the AI) handles categorization from there. No bank login required. Free tier available.
Get your finances on track with SpendGuard
Track spending, plan your FIRE date, and get AI-powered advice — all in one place. Free to start.
Start for free →